Troubleshooting Your AC: First Steps to Take
Air conditioning repair tips can save you hundreds of dollars and prevent uncomfortable downtime during hot weather. Here are the most essential fixes to try before calling a professional:
- Check power sources – Verify circuit breakers haven’t tripped
- Replace dirty filters – Do this every 1-3 months for optimal airflow
- Clear outdoor unit debris – Maintain 2 feet of clearance around the condenser
- Inspect thermostat – Replace batteries and confirm proper settings
- Clean condenser coils – Gently spray with garden hose to remove dirt
- Check condensate drain – Clear clogs with a stiff wire
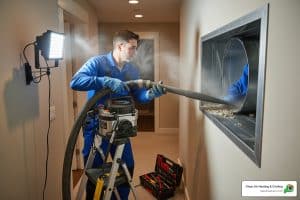
When your air conditioner stops working on a hot summer day, it’s easy to panic. But before you reach for the phone, several simple troubleshooting steps might get your system running again without the expense of a service call.
Most car owners understand how regular maintenance extends vehicle life, and your AC system works the same way. Regular upkeep not only prevents breakdowns but also keeps your system running efficiently, potentially reducing energy consumption by 5-15% according to the U.S. Department of Energy.
I’m Colin Matei, owner of Clean Air Heating & Cooling, and I’ve spent years helping homeowners across Bellingham and surrounding counties diagnose and repair their cooling systems, developing practical air conditioning repair tips that empower homeowners to solve common problems safely.

Air Conditioning Repair Tips Toolkit: Gear Up Safely
Ever tried fixing something without the right tools? It’s like trying to eat soup with a fork – frustrating and messy! When it comes to AC troubleshooting, having the right equipment on hand can transform you from confused homeowner to confident DIY hero.
I’ve seen countless folks in Bellingham attempt repairs with makeshift tools, only to call us later when they’ve made things worse. Let’s prevent that by stocking your air conditioning repair tips toolkit properly.
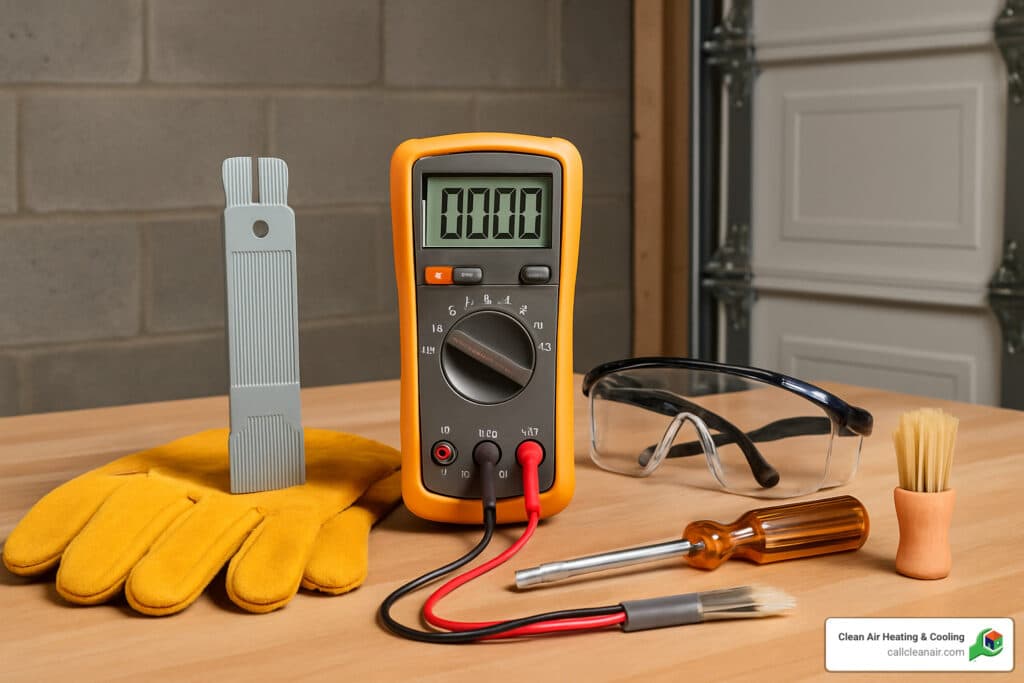
Basic Tools Every Homeowner Should Have:
Think of these as your AC first-aid kit. Most homeowners already have screwdrivers around the house – both flathead and Phillips will come in handy for accessing panels. A voltage tester is absolutely essential for safety – never skip checking that the power is truly off before touching any electrical components!
Your garden hose with an adjustable nozzle will become your best friend during condenser coil cleaning. Pair that with a soft brush for gentle debris removal, and you’ve got most of what you need for regular maintenance.

Don’t overlook safety equipment! Gloves and safety goggles might seem excessive for “just an AC fix,” but I’ve treated too many eye injuries from flying debris to recommend skipping them. A shop vacuum will help with both outdoor debris and clearing stubborn drain line clogs, while a digital thermometer helps confirm whether your system is cooling properly.
For those feeling a bit more adventurous, consider adding a multimeter for testing electrical components, coil cleaner solution for deeper cleaning, and a fin comb to straighten those delicate aluminum fins on your condenser. Zip ties and insulation tape are small investments that can secure loose components and seal minor air leaks.
“With the right tools, homeowners can safely handle about 80% of common AC issues,” our lead technician often tells customers. “It’s like having a first aid kit for your cooling system.”
Before starting any repair project, always follow these safety steps:
1. Turn off power at both the thermostat and circuit breaker
2. Verify power is off using your voltage tester
3. Work in good lighting conditions
4. Never force components that resist movement
For those mysterious issues that require specialized equipment like refrigerant leak detectors or professional-grade diagnostics, it’s time to call in the experts. Learn more about our comprehensive Air Conditioning Repair Service for those tougher problems.
Want to understand how your AC system actually works before diving into repairs? Check out our guide on How Does an Air Conditioner Work? for a clear explanation of the cooling process.
Restore Power & Thermostat Function First
When your AC suddenly goes silent on the hottest day of summer, don’t panic! In my years of experience, I’ve found that power issues are the most common culprit – and often the easiest to fix. Let’s tackle these simple checks before assuming you need expensive repairs.
Your home’s circuit breaker panel is the first place to look. Air conditioners are power-hungry beasts, especially when they first kick on. This startup surge can easily trip a breaker. Head to your electrical panel and look for any switches that are either fully off or sitting awkwardly in the middle position. To reset a tripped breaker, push it firmly to the “off” position first, then flip it back to “on.” If you have an older home with fuses instead, check for discoloration or broken filaments and replace any blown fuses with identical amperage ratings.
“It’s always a tense moment when you run the AC for the first time each year,” one of our technicians often tells customers. “About 30% of our summer service calls turn out to be simple circuit breaker issues that homeowners could fix themselves.”
Many homeowners don’t realize their system has an emergency shut-off switch that looks just like a regular light switch. These are typically located near your indoor air handler or beside the outdoor unit, often on a small red plate. Make sure it’s in the “on” position – sometimes these get accidentally flipped during yard work or home maintenance.
Your thermostat is the brain of your cooling system, and even small issues here can keep your AC from running. If yours uses batteries, replace them annually as a preventive measure. Double-check that it’s set to “Cool” mode (not “Heat” or “Off”) and that your target temperature is at least 5 degrees below the current room temperature. Also, ensure your thermostat isn’t placed in direct sunlight or near heat sources like lamps or kitchen appliances, which can cause inaccurate readings.
Quick Air conditioning repair tips for a “dead” system
When your system seems completely lifeless, try this power reset sequence:
1. Turn the thermostat to “Off”
2. Switch off the circuit breaker to the AC unit
3. Wait 30 minutes (this allows pressure to equalize inside the system)
4. Turn the circuit breaker back on
5. Wait 5 minutes for the system to initialize
6. Set thermostat to “Cool” and your desired temperature
If that doesn’t work, try a thermostat reboot by removing the cover and, for digital models, taking out the batteries for about 5 minutes before reinstalling them and reprogramming your settings.
Don’t overlook the low-voltage check. Your AC’s control circuit operates on 24 volts, and if this circuit gets interrupted, your system won’t respond to commands. After turning off power at the breaker, remove the thermostat cover and look for any loose or disconnected wires. Gently secure any loose connections you find.
After many repairs, your AC system may have a built-in restart delay of up to 10 minutes to protect the compressor. This is normal! Be patient when testing your fixes – rushing to conclusions might lead you to think your repair didn’t work when the system just needs a moment to restart safely.
For a deeper understanding of how your cooling system actually works, visit our How Does an Air Conditioner Work? page.
Boost Airflow With Filter & Vent Care
One of the most effective air conditioning repair tips involves something many homeowners walk past every day without a second thought: your air filter and vents. In my years serving Whatcom, Skagit, and Snohomish counties, I’ve found that restricted airflow is behind about 60% of the cooling problems we encounter. It’s like trying to breathe through a straw – your system simply can’t perform.
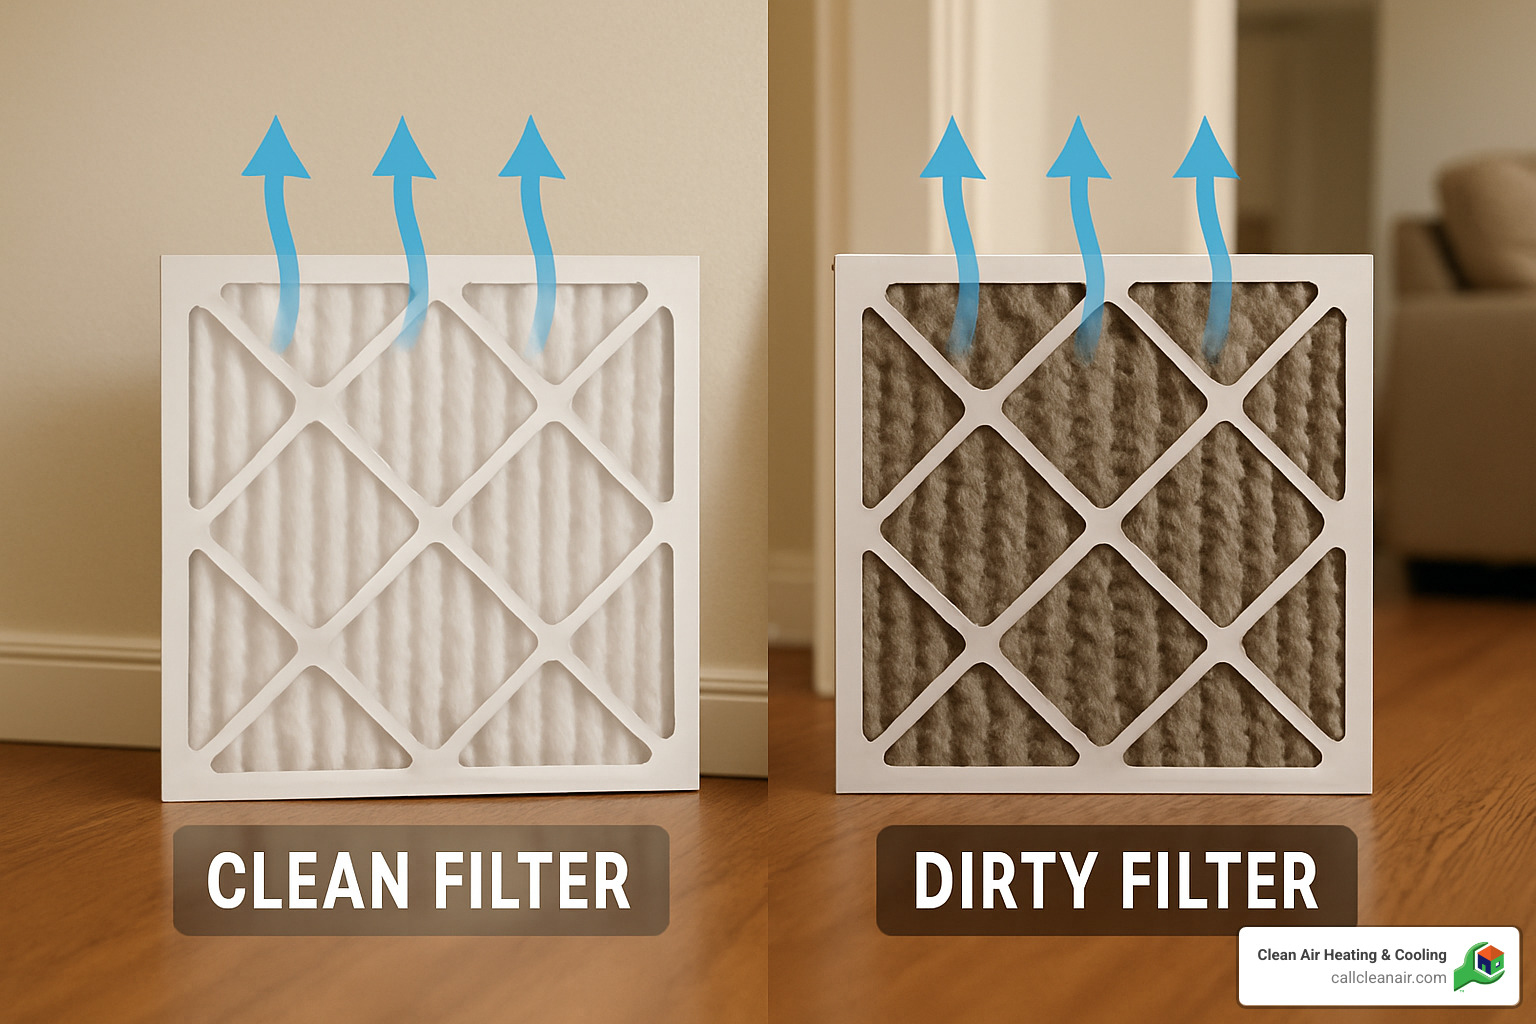
Filter Maintenance: Your First Line of Defense
Think of your AC filter as the lungs of your cooling system. When these lungs get clogged, everything suffers. According to the U.S. Department of Energy, simply replacing or cleaning your filters regularly can lower your air conditioner’s energy consumption by 5% to 15% – that’s real money back in your pocket each month.
Finding your filter is the first step – look either at the return air duct or inside your air handler/furnace. Here’s a quick test: hold your filter up to a light source. Can’t see light through it? Time for a replacement.
Most homeowners should replace basic 1-inch filters every 30-60 days, while larger pleated 4-inch media filters can last 3-6 months. If you have pets shedding fur or family members with allergies, you’ll want to change them even more frequently.
When selecting filters, pay attention to the MERV rating (Minimum Efficiency Reporting Value). For most homes, a MERV 5-8 filter provides good filtration without restricting airflow. Homes with pets or allergy sufferers might benefit from MERV 9-12 filters, while MERV 13+ offers hospital-grade filtration but may restrict airflow in some residential systems.
“A dirty filter is like trying to breathe through a pillow,” our service manager often tells customers. “Your system struggles and guzzles energy just trying to pull air through.”
Vent and Register Management
Even with a clean filter, blocked vents can sabotage your comfort. Start by ensuring furniture, curtains, and rugs aren’t blocking any supply or return vents. Contrary to what many believe, closing vents in unused rooms doesn’t save energy – it actually creates pressure imbalances that make your system work harder.
Take a few minutes to vacuum dust and debris from your supply and return registers. While you’re at it, check that any manual dampers in your ductwork are open, and adjust register louvers to direct air where you need it most. These simple steps can dramatically improve comfort throughout your home.
Return Air Considerations
Your return air system deserves just as much attention as your supply vents. Keep return air grilles unobstructed and clean them monthly with a vacuum. Ensure the pathways to return vents (like hallways) remain clear – a blocked return is like trying to blow up a balloon while pinching the end.
If certain rooms in your home feel stuffy despite your best efforts, you might need additional return air vents. Proper airflow balance is crucial for maintaining even temperatures throughout your home.
For more detailed guidance on filter selection and maintenance, the Air Conditioner Filters guidance from the Department of Energy offers excellent resources.
For homeowners in Bellingham and surrounding areas who’d rather leave the maintenance to professionals, our comprehensive service includes thorough airflow optimization. Learn more about how we can help on our Bellingham AC Maintenance page.
Your AC system is only as good as the air it can move. A little attention to filters and vents today can prevent an uncomfortable (and expensive) breakdown tomorrow.
Deep-Clean Coils & Outdoor Unit Like a Pro
Your air conditioning system has two critical coil components: the evaporator coil (inside) and the condenser coil (outside). Keeping these clean is one of the most valuable air conditioning repair tips we can offer.
Condenser Coil Cleaning (Outdoor Unit)
The outdoor condenser unit has a tough job – it rejects all that heat from your home into the outside air. When it gets dirty, your system works harder and costs you more.
First things first – turn off power to your unit at both the disconnect box and circuit breaker. Safety always comes first! Once that’s done, take a look around your unit. Is it surrounded by leaves, grass clippings, or other yard debris? Clear all that away.
“Maintaining at least 2 feet of clearance around your condenser unit is crucial,” our maintenance supervisor often tells customers. “We frequently find units practically buried in shrubs or debris that block airflow and trap heat, making your system work much harder than it needs to.”
To really get in there and clean, you’ll need to remove the top fan grill (usually held by a few screws or clips). With that off, you can gently clean those delicate fins from the inside out using a soft brush. If they’re really dirty, apply a specialized coil cleaner according to the product directions.
When rinsing, use a garden hose with gentle pressure, working from inside out. Never blast your coils with a pressure washer – those fins are delicate! Speaking of fins, if you notice any bent ones, a fin-straightening comb matched to your unit’s fin density can gently restore proper airflow.
Once everything’s clean, reassemble your unit and restore power. You’ll be amazed at the difference in performance.
Evaporator Coil Access and Cleaning (Indoor Unit)
The evaporator coil inside your home is where the magic happens – it absorbs heat from your indoor air. Cleaning it requires a bit more care and precision.
Start by turning off power to your entire HVAC system. Locate the access panel on your air handler or furnace, and remove it using the appropriate screwdrivers. Inside, you’ll find the evaporator coil – it looks like a radiator with fins.
If you see dirt buildup, spray with a no-rinse coil cleaner specifically designed for evaporator coils. Let the cleaner work its magic and drip into the drain pan below. Once done, replace the access panel and restore power.

Coil Fin Maintenance
Those aluminum fins on both coils might seem like a minor detail, but they’re crucial for heat transfer. When bent, they restrict airflow and reduce efficiency.
A fin comb that matches your unit’s fin density (fins per inch) is an inexpensive tool that can make a big difference. Gently insert the comb and pull straight through bent sections, working in small areas to avoid causing more damage.
For your outdoor unit, consider adding a protective mesh screen to prevent future damage from debris and weather. It’s a small investment that can prevent bigger problems down the road.
According to the U.S. Department of Energy’s latest research on condenser maintenance, proper coil care not only improves efficiency but can significantly extend the life of your system by preventing unnecessary strain on the compressor.
When your coils are clean and fins are straight, your system breathes easily – just like you do when your home is perfectly cooled on those hot summer days.
Drain Line, Leaks & Freeze Prevention
Water issues and refrigerant problems can quickly turn a perfectly good day into a sweaty, uncomfortable mess. Let me walk you through how to handle these common AC troubles before they lead to bigger headaches.
Condensate Drain Maintenance
Your air conditioner doesn’t just cool your home—it’s actually dehumidifying too! All that moisture has to go somewhere:
“I can’t tell you how many emergency calls we get that could have been prevented with a little drain maintenance,” says our service technician. “Algae buildup in condensate lines is extremely common in our humid Northwest Washington climate. A quarterly drain cleaning with vinegar can prevent most clogs.”
To keep your system draining properly, first locate the condensate drain line—typically a PVC pipe near your indoor unit that runs outside. Check for clogs by looking for standing water in the drain pan under the indoor coil (never a good sign). If you spot water pooling where it shouldn’t be, it’s time to clear the drain.
You’ve got three good options here: Use a wet/dry vacuum attached to the outdoor end of the line for suction power; pour a cup of vinegar down from the indoor access point to dissolve buildup; or carefully use a stiff wire to push through stubborn blockages. Just five minutes of maintenance every few months can prevent water damage and emergency shutdowns.
Float Switch Function
Many modern AC systems include a clever safety device—a float switch that automatically shuts down your system if water starts backing up. Think of it as your AC’s personal lifeguard.
This small but mighty switch sits in the secondary drain pan, ready to spring into action if water levels rise. Make sure it moves freely up and down and isn’t gunked up with debris. If your system keeps mysteriously shutting off, this switch might be trying to tell you something about your drainage situation.
Refrigerant Leak Detection
While fixing refrigerant issues requires professional certification (it’s the law!), you can certainly play detective to spot potential problems:
Look for oil stains on refrigerant lines or connections—these are telltale signs of a leak. Listen carefully for hissing sounds near the outdoor unit or refrigerant lines. Pay attention to your system’s cooling performance—gradually declining cooling ability often means refrigerant is escaping somewhere. And check for ice buildup on refrigerant lines, which typically indicates your system is running low on refrigerant.

If you suspect a refrigerant leak, it’s time to call in the pros at Clean Air Heating & Cooling. Refrigerant handling is strictly regulated by the EPA for good reason—it’s harmful to both your system and our environment. For more information on refrigerant regulations, check out the EPA’s page on Stationary Refrigeration Leak Repair Requirements.
Air conditioning repair tips to stop your AC from freezing
Finding your AC coil transformed into an ice block is surprisingly common. Our lead technician notes, “When homeowners call about an AC that’s running but not cooling, we often find a frozen evaporator coil. The good news is that in about 70% of cases, simply replacing a clogged filter and thawing the system solves the problem.”
If you find ice where it doesn’t belong, here’s what to do: First, switch to fan-only mode for 24 hours to let all that ice melt away completely. While you’re waiting, replace the air filter if it’s dirty—this is the number one cause of freezing issues. Make sure all vents are open and unblocked throughout your home, and check for any blocked return air pathways.
Once everything’s thawed, inspect refrigerant lines for any remaining frost and monitor airflow from your vents when you restart the system. If the freezing returns despite these steps, it’s likely time for professional help—you may have a refrigerant issue that requires certified technicians.
Regular maintenance prevents most of these problems before they start. Just like changing your car’s oil prevents engine damage, a little AC TLC goes a long way toward keeping your cool all summer long.
Know When DIY Ends: Costs, Warranty & Pro Help
While many air conditioning repair tips can help you solve common problems, there comes a point when you’ll need to wave the white flag and call in reinforcements. Knowing when to set down your tools can save you time, money, and potentially a headache or two.
Common Repair Costs vs. DIY Solutions
The average homeowner spends around $300 when professional AC repairs become necessary. That said, some simple fixes offer significant savings if you’re comfortable doing them yourself.
For instance, replacing a capacitor might cost $200-$250 when a technician does it, but only $20-$40 if you handle it yourself. Similarly, contactor replacements run $175-$225 professionally versus just $15-$30 DIY. Even condensate pump replacements show substantial differences: $240-$450 for professional service compared to $60-$120 for the ambitious homeowner.
“I had a customer who proudly showed me how he’d replaced his own thermostat,” shares our installation manager. “He saved nearly $200 and it was working perfectly. Sometimes a little research and careful work really pays off.”
Annual professional maintenance typically costs between $65 and $200, but think of this as an insurance policy against those middle-of-summer breakdowns that always seem to happen during heat waves.
Warranty Considerations
Before you start dismantling your AC unit, take a moment to check your warranty status:
Most manufacturer warranties require professional maintenance records to remain valid. That DIY repair might save you $100 today but could cost you thousands if it voids your warranty coverage during a major breakdown.
DIY repairs on major components often nullify remaining warranty protection, especially when it comes to the compressor or sealed refrigerant system. Manufacturers aren’t being difficult—they simply need assurance that qualified technicians are handling sensitive components.
Some warranties explicitly require service by certified technicians with specific credentials. Always review your paperwork before making any significant repairs yourself.
“The saddest calls we get are from folks who need a new compressor but voided their warranty with well-intentioned DIY repairs,” our warranty specialist notes. “Always check your warranty terms before opening panels or replacing parts.”
When to Call Clean Air Heating & Cooling
Here’s when it’s definitely time to put down the toolbox and pick up the phone:
Electrical issues beyond simple breaker resets pose safety risks that aren’t worth taking. Our technicians have proper training and safety equipment for a reason.
Refrigerant problems including leaks or recharging legally require EPA certification. Not only is handling refrigerant without certification against federal regulations, but it’s also potentially dangerous.
Compressor issues indicated by unusual noises or failure to start likely require professional diagnosis. The compressor is the heart of your system, and problems here often indicate complex issues.
Persistent freezing despite trying the DIY solutions mentioned earlier often points to refrigerant issues that need professional attention.
Water damage extending beyond the immediate drain area may indicate larger problems with your condensate system or even structural concerns.
Burning smells or smoke from any component mean it’s time to shut everything down and call for help immediately.
Age-related decline in systems over 10 years old might benefit more from professional assessment than piecemeal DIY repairs.
We proudly serve Whatcom, Skagit, Snohomish, and San Juan Counties with prompt, reliable service backed by over 480 5-star Google reviews from your neighbors.
Money-saving air conditioning repair tips vs. calling a pro
Making the best financial decision isn’t always about choosing the lowest immediate cost. Consider the complexity of the repair first—simple maintenance like filter changes and coil cleaning are generally safe DIY projects with good returns on your time investment.
Next, evaluate tools needed. If you need to purchase specialized tools that cost more than the repair service itself, professional help usually makes more sense. As one customer told us, “I spent $85 on special tools to save $100 on a repair. Not my brightest moment!”
Don’t forget to factor in time. Some repairs that take our professionals 30 minutes might consume your entire Saturday. Your time has value too.

Perhaps most importantly, calculate energy costs over time. Professional tuning can improve efficiency by 15-20%, creating monthly savings that add up significantly. Our 25% utility savings guarantee reflects our confidence that professional maintenance pays for itself through lower energy bills and extended equipment life.
Finally, assess safety risks honestly. Electrical and refrigerant work carries risks that often outweigh potential savings. Your family’s safety is worth more than saving on repair costs.
“I’ve been working on HVAC systems for over 15 years,” says our lead technician, “and I still approach each unit with respect. These systems combine high voltage electricity, pressurized refrigerant, and mechanical components—a combination that demands proper training and tools.”
For more information about what you might expect to pay for various air conditioner repairs, visit our Average Cost to Repair Air Conditioner page.
Frequently Asked Questions About Home AC Repair
How often should I change or clean my AC filters?
Let’s talk about one of the most common questions I hear from homeowners – filter maintenance. While the general guideline is to check monthly and replace every 1-3 months during cooling season, your specific situation might call for a different schedule.
If you’re using those basic 1-inch disposable filters, plan on monthly replacements when your system is running regularly. However, if you’ve upgraded to 4-inch pleated filters, you might get away with changes every 3-6 months.
Your household situation matters too. Do you have furry friends shedding around the house? Is someone in your home a smoker? Are you renovating and creating extra dust? All these factors mean more frequent filter changes. And if anyone in your home suffers from allergies or asthma, fresh filters become even more important.
“The filter check is the single most valuable maintenance task a homeowner can perform,” notes our indoor air quality specialist. “It takes just 60 seconds but can prevent 40% of the emergency calls we receive.”
What’s the safest way to check for refrigerant leaks at home?
While you should never handle refrigerant yourself (it requires professional certification), you can safely look for signs that might indicate a leak in your system.
Start with a visual inspection of your copper refrigerant lines and connections. Notice any oily residue? That’s often the first sign of a leak. Next, pay attention to how your system performs. If cooling cycles are gradually getting longer but your home isn’t getting as cool, that could signal refrigerant loss.
You can also do a simple temperature test. Use a thermometer to measure the air temperature at a return vent, then at a supply vent. In a properly functioning system, you should see a difference of about 14-20°F. Anything less might indicate low refrigerant levels.
For accessible connections (never valves!), you might try the soap bubble test. Just mix some dish soap with water, apply the solution to suspected leak areas, and watch for bubbles forming.
If any of these checks raise concerns, it’s time to call in professionals. Refrigerant leaks not only hurt your system’s performance but can also harm the environment.
Why does my system keep turning on and off every few minutes?
That frustrating on-again, off-again behavior has a name – short cycling – and it’s bad news for both your comfort and your system’s lifespan. Think of it like constantly starting and stopping your car instead of cruising at highway speeds; it creates excessive wear and tear.
Your AC might be short cycling for several reasons. Sometimes it’s because the system is actually oversized for your home – it cools too quickly, then shuts off, only to start the cycle again moments later. More commonly, though, the culprit is a dirty filter restricting airflow, which causes the system to overheat and shut down.
Low refrigerant levels can also trigger short cycling because the system can’t remove enough heat and eventually overheats. Check your thermostat location too – if it’s in direct sunlight or near a heat source like a lamp or TV, it might be misreading your home’s temperature.
Electrical problems like failing capacitors or contactors often cause rapid cycling as well. And don’t forget to check for a frozen evaporator coil, which restricts airflow and triggers protective shutdowns.
“Short cycling can reduce your system’s lifespan by up to 50%,” warns our technical director. If the problem persists after you’ve checked filters and ensured proper airflow, it’s time for professional help before permanent damage occurs to expensive components.

Conclusion
Armed with these air conditioning repair tips, you’re now better equipped to handle common AC issues and know when to call for professional help. Regular maintenance is truly the key to preventing most air conditioning problems before they start.
I’ve seen how a little preventive care can save homeowners thousands in emergency repairs. Just like you wouldn’t skip oil changes in your car, your AC system needs regular attention to run efficiently and reliably.
Seasonal Maintenance Checklist
Before summer’s heat arrives, take time for some spring preparation. Replace those air filters, clean around your outdoor unit, and check your thermostat batteries. A quick test run on the first mild day can reveal small issues before they become big problems during a heatwave. Don’t forget to pour some vinegar down the condensate drain line – this simple five-minute task prevents those frustrating mid-summer clogs.
During the cooling season, stay vigilant. A monthly filter check takes seconds but can save you hundreds in repair costs and improve your indoor air quality dramatically. Keep an ear out for unusual noises – your system will often “tell you” something’s wrong before it fails completely.
When fall arrives and cooling season ends, give your system a proper send-off. Clean the outdoor unit one final time and inspect for any damage that might need addressing before next year. Some manufacturers recommend protective covers for winter, but check your specific model’s guidelines first.
Following these simple maintenance steps helps maintain energy efficiency while extending your system’s lifespan. Many of our customers are surprised to find their utility bills dropping by 10-15% after implementing just a few of these maintenance practices.
For homeowners across Bellingham, Whatcom, Skagit, Snohomish, and San Juan Counties, our team at Clean Air Heating & Cooling is always ready to help with issues beyond DIY solutions. We understand that some repairs require professional expertise, and we’re just a phone call away when you need us.
Our 25% utility savings guarantee isn’t just marketing – it reflects our confidence in proper maintenance. When your system runs efficiently, everybody wins: you enjoy reliable comfort and lower energy bills, while reducing your environmental footprint.
For more information about our comprehensive HVAC services, visit our HVAC Services page or call us to schedule a maintenance appointment. Stay cool!