Why Proper Geyser Installation in Bathroom Matters
Geyser installation in bathroom is a critical project that demands careful execution to ensure safety, efficiency, and reliable hot water. A proper installation prevents serious problems like water damage, electrical hazards, and poor performance.
Key Steps for Successful Bathroom Geyser Installation:
- Choose the Right Type & Location: Select an instant or storage geyser and find a safe, well-ventilated spot at least 6 feet high.
- Gather Tools & Materials: Prepare a wrench, drill, level, Teflon tape, pipes, valves, and mounting hardware.
- Mount & Connect: Securely mount the unit, connect the cold inlet and hot outlet, and install the pressure relief valve.
- Wire Safely: Use a dedicated MCB circuit with proper grounding and place switches outside the bathroom.
- Set & Test: Adjust the thermostat to a safe 120°F (49°C) and thoroughly check for leaks and proper operation.
The comfort of a hot shower is a daily necessity, especially during cold Pacific Northwest winters. But a poorly installed geyser can lead to costly leaks, fire or shock hazards, and even carbon monoxide poisoning with gas units. With most water heaters lasting 8-15 years, a proper replacement installation is key to avoiding frustration and safety risks.
This guide provides actionable steps for a successful bathroom geyser installation, whether you’re attempting a DIY project or hiring a professional.
As Colin Matei, Owner and President of Clean Air Heating & Cooling, I’ve overseen countless water heater installations throughout Whatcom and Skagit Counties. We help homeowners achieve safe, efficient systems that serve their families for years. This guide shares the expertise our team uses every day to deliver reliable comfort to our community.
, space requirements (instant: compact wall-mount, storage: larger floor or wall unit), energy efficiency ratings, and recommended applications for each type - geyser installation in bathroom infographic")
Choosing the Right Geyser & Preparing for Installation
Before starting your geyser installation in bathroom, smart planning is essential. You need to choose the right geyser type, find the perfect location, gather your tools, and safely drain any old unit. Always check local building codes in Whatcom, Skagit, or Snohomish Counties, as requirements can vary.
Understanding Geyser Types: Instant vs. Storage
Your first decision is between an instant (tankless) and a storage (tank) geyser. This choice impacts installation, energy use, and your daily hot water supply.
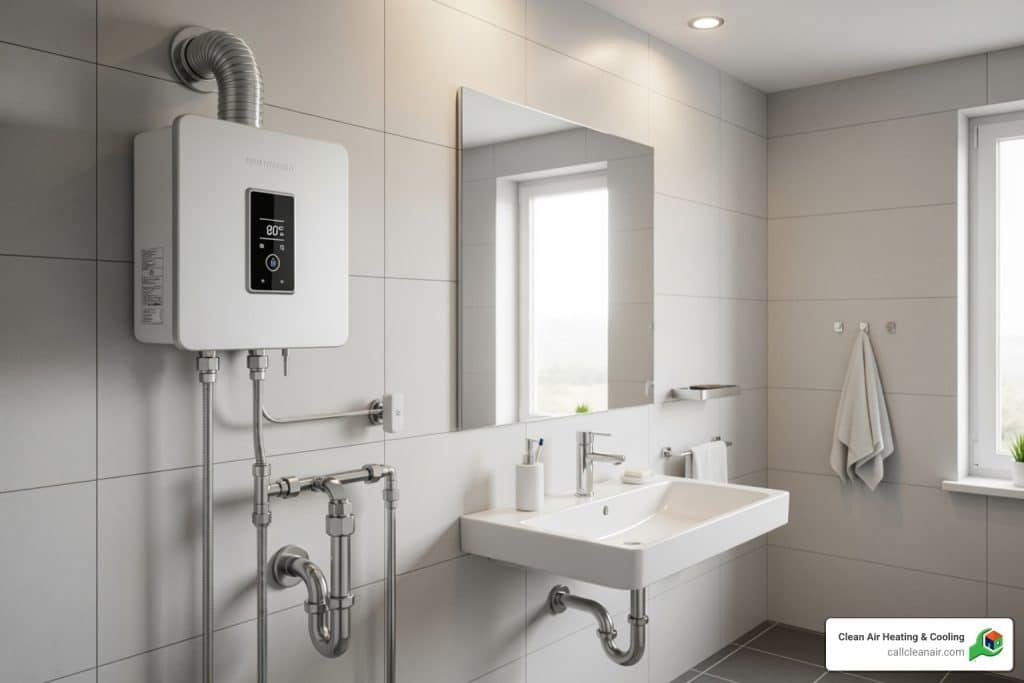
Instant geysers heat water on demand, providing a continuous flow. They are compact, highly efficient (up to 98%), and can last 20 years. However, they require significant power, often needing dedicated electrical circuits or upgraded gas lines. They are ideal for smaller homes or those looking to save space and energy.
Storage geysers use a tank to heat and store 25 to 75 gallons of water. They are great for large families with high simultaneous demand. The downside is their larger size, lower efficiency (67-75%) due to standby heat loss, and a 30-60 minute recovery time once the tank is empty. Installation can be simpler if you’re replacing a similar unit.
Here’s how they stack up:
| Feature | Instant (Tankless) Geyser | Storage (Tank) Geyser |
|---|---|---|
| Space | Very compact, often wall-mounted | Larger unit, can be floor-standing or wall-mounted |
| Hot Water | On-demand, continuous supply | Limited by tank capacity, heats in batches |
| Energy Use | Highly efficient (up to 98%), heats only when needed | Less efficient (67-75%), keeps water hot constantly |
| Installation | May require upgrades to electrical/gas lines, specific venting | Generally simpler if replacing similar unit |
| Best For | Small homes, single bathrooms, energy-conscious users | Larger families, multiple bathrooms, high simultaneous demand |
Both types are available in electric and gas models. To learn more, check out our guide with more info on tankless heaters.
Selecting the Optimal Location in Your Bathroom
Proper placement is crucial for safety and performance.
- Height: Install the geyser at least 6 feet (1.8 meters) high to ensure good water pressure and keep it away from floor-level water.
- Wet Zones: Keep the unit away from the shower, tub, and sink to prevent water from contacting electrical components.
- Ventilation: Allow at least 6 inches of clearance on all sides for airflow, preventing overheating and enabling maintenance. Proper ventilation is critical for gas models to safely vent exhaust.
- Wall Strength: The wall must support the full weight of the unit (a filled storage tank can weigh hundreds of pounds). Use heavy-duty anchors, and consider reinforcing the wall with wooden backing.
- False Ceilings: If installing above a false ceiling, plan for maintenance access with a panel. Horizontal geysers may be a better fit. For more on this, you can read a discussion on geysers and false ceilings.
Gathering Your Tools and Draining the Old Unit
Being prepared prevents delays. Here’s what you’ll need for your geyser installation in bathroom.
- Tools: Adjustable wrenches, pipe wrench, measuring tape, level, power drill, screwdrivers, wire strippers/cutters, and a non-contact voltage tester. Also have a hose, bucket, and safety gear (glasses, gloves).
- Materials: Teflon tape, new flexible water supply lines, a new pressure relief valve, a discharge pipe, mounting anchors, and appropriate electrical cable/connectors/MCB for electric models.
To drain an old unit:
- Turn off power and water. Shut off the circuit breaker (electric) or gas supply valve (gas), and close the main water supply valve to the heater.
- Release pressure. Open a hot water faucet somewhere in the house.
- Drain the tank. Connect a garden hose to the drain valve at the bottom of the tank and run it to a floor drain or outside. Open the valve and let it empty completely. This may take time due to sediment.
- Disconnect and remove. Once empty, disconnect the water lines and electrical/gas connections. Carefully remove the old unit and clean the area.
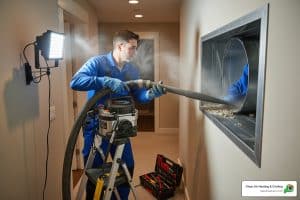
A Guide to the Physical Geyser Installation in Bathroom
With the prep work done, it’s time for the physical geyser installation in bathroom. This phase requires precision to ensure your new unit is secure, leak-free, and safely wired.
If you’re a visual learner, you can View an installation diagram to see how these components connect.
Step 1: Mounting the Geyser Securely
A geyser, especially a storage model filled with water, is extremely heavy. Secure mounting is not optional.
- Mark the Location: Use a measuring tape and level to mark the drill spots on the wall, ensuring the 6-foot minimum height.
- Drill Pilot Holes: Drill holes appropriate for your anchors and wall type.
- Install Anchors: Use fasteners rated for the geyser’s weight. Use expansion anchors for masonry, heavy-duty toggle bolts for drywall, or lag screws directly into wall studs.
- Attach Brackets: If your unit uses them, attach mounting brackets to the wall, ensuring they are level.
- Hang the Unit: With a helper, carefully lift the geyser onto the brackets or fasteners.
- Check for Level: Use a carpenter’s level on the top and sides of the unit to confirm it is perfectly level and plumb. This prevents stress on connections and ensures proper operation.
Step 2: Proper procedure for a safe geyser installation in bathroom
Correct water connections prevent leaks and water damage. This is how we ensure water flows only where it should.
- Prepare Threads: Wrap Teflon tape 3-4 times clockwise around all male pipe threads to create a watertight seal.
- Connect Cold Water Inlet: Attach the cold water supply line to the inlet (usually marked blue). Hand-tighten first, then give it a final turn with a wrench. Do not overtighten.
- Connect Hot Water Outlet: Connect the hot water line to the outlet (usually marked red), which will feed your faucets and shower.
- Install the Pressure Relief Valve (T&P Valve): Always use a new T&P valve. This critical safety device prevents dangerous pressure buildup. Screw it into its designated port.
- Attach Discharge Pipe: Connect a pipe to the T&P valve, running it down to within six inches of the floor or a drain pan. This pipe must remain unobstructed.
- Fill the Tank & Check for Leaks: Slowly turn on the main water supply. Open a hot water faucet to let air escape as the tank fills. Once water flows steadily, close the faucet and inspect every connection for drips. Gently tighten any leaking joints.
Step 3: Making Safe Electrical Connections
If you are not 100% confident with electrical work, hire a licensed professional. Mistakes can cause fires, shocks, or death.
- Turn Off Main Power: Shut off the main breaker at your electrical panel. Use a non-contact voltage tester to confirm the circuit is dead.
- Use a Dedicated Circuit: The geyser must be connected to its own Miniature Circuit Breaker (MCB), sized according to the manufacturer’s specifications.
- Connect Wires: Following the wiring diagram, connect the live, neutral, and ground wires to their correct terminals.
- Ensure Proper Grounding: The ground wire is a critical safety feature that protects against electrical faults. Ensure it is securely connected.
- Place Switch Safely: The power switch for the geyser should be located outside the bathroom or in a dry area far from any water source.
- Insulate Connections: Use wire nuts and electrical tape to secure all connections, ensuring no bare wire is exposed. Fasten the junction box cover securely.
Once complete, you can restore power at the main panel and then turn on the geyser’s dedicated circuit.

Post-Installation: Safety, Settings, and Efficiency
The physical work is done, but a professional geyser installation in bathroom isn’t complete without final checks. These steps ensure your unit works safely and efficiently for years.
Critical Safety Checks and Preventing Scalds
Before you enjoy that first hot shower, perform these essential safety checks:
- Test the T&P Valve: Gently lift the lever on the Temperature and Pressure (T&P) relief valve. A burst of hot water should flow from the discharge pipe. If not, the valve is faulty and must be replaced immediately. Test this valve annually.
- Check for Leaks: Double-check all water connections for drips. For gas geysers, apply soapy water to gas fittings—bubbles indicate a leak that must be fixed before use.
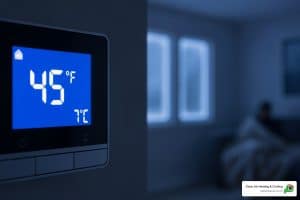
- Set a Safe Temperature: We recommend setting the thermostat to 120°F (49°C). This is hot enough for household needs while significantly reducing the risk of scalding, which is especially important for homes with children or elderly members.
- Consider Mixing Valves: For added protection against sudden temperature spikes, install thermostatic mixing valves at your shower and sink.
- Use Safety Features: If your geyser has a child safety lock, activate it and educate your family about hot water safety.
Optimizing for Energy Efficiency
A properly configured geyser saves you money every month. These simple adjustments can make a big difference:
- Lower the Thermostat: The 120°F setting isn’t just for safety; every 10°F reduction can save 3-5% on your water heating costs.
- Use a Timer: For storage geysers, a timer can heat water only when you need it (e.g., before your morning shower), cutting down on standby energy loss. Most tanks need 30-60 minutes to heat fully.
- Insulate Pipes: Wrap the first 6 feet of the hot and cold water pipes connected to your geyser. This inexpensive step reduces heat loss and delivers hot water faster.
- Choose High-Efficiency Models: Tankless heaters can be up to 98% efficient, compared to 67-75% for many storage tanks. Homeowners in Whatcom and Skagit counties may qualify for rebates. We can help you take advantage of Electric Water Heater Rebates and PSE Heat Pump Water Heater Rebates.
For more tips, Explore our Water Heaters category for additional resources.
Maintenance, Troubleshooting, and When to Call a Pro
A proper geyser installation in bathroom is just the beginning. Like a car, your water heater needs regular maintenance to extend its lifespan, prevent costly repairs, and ensure safety. It’s also important to know how to troubleshoot common issues and when to call a professional.
For more details, see our Water Heater Experts: Complete Guide or Explore our Water Heaters category.
Routine Maintenance for a Long-Lasting Geyser
Preventive care keeps your geyser running efficiently.
- Drain and Descale the Tank (Storage Geysers): At least once a year, partially drain the tank to flush out mineral sediment. This buildup forces the heater to work harder and can shorten its life.
- Check the Anode Rod (Storage Geysers): Inspect this “sacrificial” rod every 2-3 years. It corrodes to protect the tank lining from rust. If it’s more than half-consumed, replace it to extend the tank’s life.
- Test the T&P Valve Annually: Lift the lever on the pressure relief valve to ensure water flows freely. If it doesn’t, or if it drips afterward, replace it immediately.
- Clean Filters (Instant Geysers): Check and clean the water inlet filter every few months to maintain optimal flow and efficiency.
Troubleshooting common issues with your geyser installation in bathroom
Before calling for service, check these common problems:
- No Hot Water: For electric units, check the circuit breaker and thermostat. For gas units, ensure the gas is on and the pilot light is lit. Also, verify the cold water inlet valve is fully open.
- Inconsistent Temperature: With instant geysers, this can happen if too many taps are running at once. For storage geysers, it could be a faulty thermostat or heating element.
- Leaks or Drips: Gently tighten connections. If a leak is coming from the tank itself, it likely means the tank has rusted through and needs replacement.
- Strange Noises: Rumbling or popping in a storage tank usually indicates sediment buildup. The unit needs to be drained and descaled.
- Discolored Water: Orange or reddish water often signals rust inside the tank, meaning a replacement is imminent.

Knowing When to Hire a Professional Technician
Some jobs are not for DIYers. Knowing when to call a pro protects your home and your family.
- Complex Electrical or Gas Work: Never attempt this yourself unless you are a licensed professional. The risks of fire, explosion, or electrocution are too high.
- Major Leaks or Tank Failure: If the tank itself is leaking, it’s time for a professional assessment and likely a replacement.
- Unfamiliarity with Local Codes: Professionals in Whatcom and Skagit Counties know the specific plumbing codes, ensuring your installation is safe and compliant, which is important for insurance and home resale.
- Warranty Protection: Many manufacturers’ warranties are voided by improper DIY installation. Professional installation preserves your warranty.
- Lack of Experience: A small mistake can cause major water damage or create a safety hazard. If you’re not completely confident, hiring a pro is the smart choice.
At Clean Air Heating & Cooling, we provide expert water heater service. Your safety and comfort are our top priorities.
Frequently Asked Questions about Bathroom Geyser Installation
After hundreds of installations across Whatcom and Skagit Counties, we’ve heard every question. Here are the most common ones, answered clearly.
How high should a geyser be installed in a bathroom?
For proper geyser installation in bathroom, the unit should be mounted at a minimum height of 6 feet (1.8 meters) from the floor. This height ensures good water pressure at your taps and keeps the geyser safely away from water splashes on the floor.
Can I install a geyser myself?
While technically possible if you have extensive plumbing and electrical experience, we strongly recommend hiring a qualified professional. A DIY geyser installation in bathroom can easily go wrong, leading to dangerous water damage, fire hazards, or carbon monoxide risks. Furthermore, most manufacturer warranties are voided by improper installation. A professional ensures the job is done safely, complies with local codes in Whatcom or Skagit County, and provides a certificate of compliance.
What is the ideal temperature setting for a bathroom geyser?
We recommend 120°F (49°C) as the ideal temperature for most homes. This provides water hot enough for all household needs while significantly reducing the risk of scalding, a critical safety consideration for families. For instant geysers, a comfortable showering temperature is typically 95–113°F (35–45°C). Setting your thermostat to 120°F is not only safer but also saves 3-5% on energy costs for every 10°F reduction.
Conclusion
Achieving that satisfying rush of hot water on a chilly Pacific Northwest morning requires more than just hanging a unit on the wall. A proper geyser installation in bathroom is a system built for safety, efficiency, and reliability.
We’ve covered the key steps, from choosing the right model to final safety checks. However, the stakes are high. A loose wire, a leaky valve, or an ignored building code can lead to dangerous and costly problems. This is why most homeowners wisely choose a professional for water heater installation. It’s about ensuring the job is done right the first time, preserving your warranty, and gaining peace of mind.
At Clean Air Heating & Cooling, we’ve installed countless water heaters across Whatcom, Skagit, Snohomish, and San Juan Counties. Our team knows the local codes and delivers installations that pass every safety check.
Whether you’re replacing a failing unit or upgrading to a more efficient model, we’re here to help. Professional installation means you can enjoy that hot shower without a single worry.
Ready for reliable hot water and peace of mind? Contact us for your water heater needs today. Let’s get your bathroom geyser installation done right.