Why Your Plumbing System Needs Protection from Thermal Expansion
Water heater expansion tank installation is a crucial safety upgrade that protects your home’s plumbing system from dangerous pressure buildup. When water heats up, it expands – and in modern homes with backflow preventers, this expanded water has nowhere to go except to stress your pipes, fixtures, and water heater itself.
Quick Installation Overview:
- Shut off water and power to your water heater
- Cut the cold water supply line near the water heater inlet
- Install a tee-fitting to create a branch for the expansion tank
- Mount the expansion tank vertically with proper support
- Connect the tank to the tee-fitting with appropriate piping
- Test all connections for leaks before restoring power
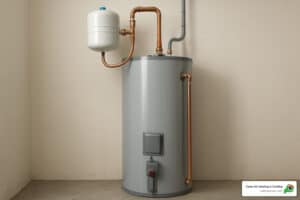
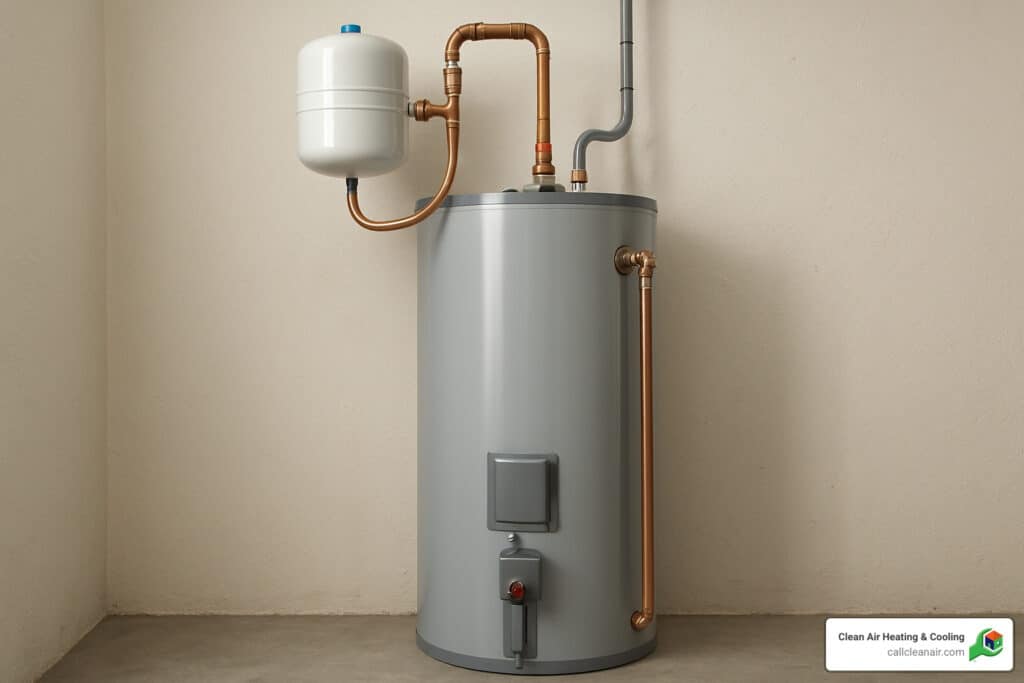
The expansion tank acts as a safety valve for your plumbing system. It contains a rubber bladder that absorbs excess water volume as it expands during heating, preventing pressure from reaching dangerous levels that could damage your Temperature and Pressure Relief Valve or cause pipe failures.
Most homes built after the 1990s require expansion tanks due to modern plumbing codes that mandate backflow prevention devices. These devices – which include pressure reducing valves and check valves – create “closed loop” systems where expanded water can’t flow back into the municipal supply.
As Colin Matei, owner of Clean Air Heating & Cooling, I’ve seen how proper water heater expansion tank installation protects homeowners from costly water damage and premature water heater failure. With years of experience serving Whatcom, Skagit, and Snohomish County families, I understand the importance of getting this installation right the first time.

Why Your Water Heater Needs an Expansion Tank
Here’s something most homeowners don’t think about: when your water heater does its job, the water inside expands. And that expansion has to go somewhere.
When water heats up from a chilly 50 degrees to a cozy 120 degrees, it grows by about 2 percent. That might not sound like much, but in a 50-gallon water heater, you’re talking about an extra gallon of water that suddenly needs space. Without an expansion tank, this extra volume creates pressure that can damage your entire plumbing system.
In the old days, this wasn’t a big problem. The expanded water would simply flow back into the municipal water supply through your service line. But modern homes are different – and that’s where things get tricky.
Building codes now require backflow preventers – devices that keep water from your home from flowing back into the public supply. These include pressure reducing valves, check valves, and water meters with built-in backflow prevention. While these devices protect the municipal water supply, they create what’s called a closed-loop system in your home.
In a closed-loop system, that expanded water has nowhere to go. The pressure builds up like air in a balloon, and something has to give. Often, it’s your Temperature and Pressure Relief Valve that takes the hit, discharging water continuously. This can damage the valve and create a safety hazard.
Worse yet, excessive pressure can burst pipes, damage fixtures, and cut your water heater’s lifespan short. Nobody wants to deal with water damage or replace a water heater years before they should have to.
That’s why water heater expansion tank installation isn’t just about following building codes – it’s about protecting your home and your family’s safety. For a detailed look at how expansion tanks fit into your system, check out our Water Heater Expansion Tank Installation Diagram With Notes.
How an Expansion Tank Works
The beauty of an expansion tank lies in its simplicity. It’s basically a metal tank with a few key components that work together to keep your plumbing system happy.
The rubber bladder is the star of the show. This flexible membrane divides the tank into two chambers – one for water and one for air. When your water heater kicks on and water starts expanding, that extra water flows into the tank and pushes against the bladder.
On the other side of the bladder is the air chamber, which comes pre-charged with compressed air at about 40 PSI. This air pressure needs to match your home’s water pressure for everything to work properly. When expanded water enters the tank, it compresses the air on the other side of the bladder.
Think of the pressurized air as a shock absorber for your plumbing system. Just like the shocks in your car smooth out bumps in the road, the compressed air smooths out pressure variations that would otherwise stress your pipes and fixtures.
The tank essentially becomes an overflow reservoir for your water heating system. When the water cools down and contracts, the compressed air pushes the water back into the system, maintaining steady pressure throughout the heating and cooling cycles.
This simple design prevents damage to your pipes, fixtures, and water heater while keeping everything running safely and efficiently. If you’re curious about how expansion tanks work with different water heating systems, take a look at our comparison of tank vs tankless water heater options.
Is an Expansion Tank Required?
Whether you need an expansion tank depends on your local plumbing codes and how your home’s plumbing is set up. In most areas, expansion tanks are required when you have a closed plumbing system – meaning water can’t flow back into the municipal supply.
Your home likely has a closed system if you have any of these common devices: check valves at the water meter, pressure-limiting valves (also called pressure reducing valves), backflow preventers required by your water supplier, or water softeners with built-in check valves.
The easiest way to tell if you need an expansion tank? Check if your Temperature and Pressure Relief Valve occasionally drips or discharges water. This is usually the first sign that thermal expansion is creating too much pressure in your system.
Here’s something many homeowners don’t realize: expansion tanks aren’t just about code compliance – they’re about protecting your water heater warranty. Many manufacturers require expansion tanks in closed systems, and skipping this step can void your warranty coverage. The small investment in an expansion tank can save you thousands in premature water heater replacement costs.
Even if your local codes don’t specifically require an expansion tank, we strongly recommend installing one if you have any pressure-limiting devices in your home. The protection it provides is worth far more than the modest cost of installation.
After all, nobody wants to deal with the headache and expense of preventing T&P valve discharge or replacing a water heater years before its time.
Preparing for Your Water Heater Expansion Tank Installation

Good prep work turns a two-hour project into a one-hour project. Start by checking your home’s static water pressure with an inexpensive gauge; 60 PSI is ideal and anything over 80 PSI calls for a pressure-reducing valve before you add an expansion tank. If you’d like a refresher on how pressure and thermal expansion are related, that short Wikipedia article is worth a skim.
If soldering, cutting pipe, or working with pressurized water makes you uneasy, calling Clean Air Heating & Cooling is the safe bet. Otherwise, gather everything you’ll need before you shut off the water.
Required Tools and Supplies (at a glance)
- 10-in. and 14-in. pipe wrenches or channel-locks
- Tube cutter
- Soldering torch or PEX crimper (depending on pipe type)
- Teflon tape & pipe dope
- Pressure gauge & bicycle pump/air compressor
- Properly sized expansion tank
- 3⁄4-in. tee-fitting, short length of pipe, dielectric union
- Sturdy Expansion Tank Mounting Bracket
A quick word on support: a 2-gallon tank weighs about 20 lb when full; larger models can top 40 lb. A bracket anchored to a framing member prevents undue stress on your plumbing.
Choosing and Pre-Charging the Tank
Sizing is simple: water heaters up to 60 gal use a 2-gal tank if line pressure is below 60 PSI and a 3.2-gal tank if it’s higher. Over 60 gal, step up to a 3.2- or 4.4-gal tank. Full details live in our thermal expansion tank sizing guide.
Most tanks arrive pre-charged to 40 PSI, but that number must match your actual water pressure. Use the Schrader valve (the tire-style valve on top) and a hand pump to tweak the charge before installation—doing it later is a hassle. Matching pressures is the single best way to avoid premature bladder failure.
Step-by-Step Water Heater Expansion Tank Installation Guide

Most homeowners can finish this project in an afternoon. Work methodically, double-check every connection, and don’t rush the pressure test at the end.
Step 1 – Shut Off Water and Power
- Close the main water shut-off valve.
- Turn off power: flip the breaker for an electric heater or set the gas control to OFF on a gas model.
- Open a hot faucet at the lowest fixture in the house to drain pressure and leave it open for the duration of the job.
Step 2 – Cut the Cold Water Line
Locate the cold-water inlet (usually the right-hand pipe) and measure about 18 in. from the heater. Mark the spot, then use a tube cutter for a clean, square cut. Deburr inside and out so the fitting seals properly.
Step 3 – Install the Tee-Fitting
- Copper: clean, flux, and sweat-solder the tee in place.
- PEX: use push-to-connect fittings or crimp rings per manufacturer instructions.
Position the branch outlet horizontally—this keeps the tank vertical and close to the heater.
Step 4 – Mount & Connect the Expansion Tank

Anchor the bracket to a stud or masonry with appropriate hardware. Thread a short nipple into the tank, wrap threads with Teflon tape, add pipe dope, and snug with a wrench—hand-tight plus a quarter-turn is enough. Keep the horizontal run under 6 in. to minimize leverage on the tee.
Step 5 – Restore Water and Check for Leaks
Slowly reopen the main valve. Watch every new joint; even a pinhole drip needs correction now, not later. A squirt bottle of soapy water makes tiny leaks obvious. When you’re leak-free, close the faucet you opened earlier and restore power or gas. Job done.
Need help or just prefer a pro? Our full water heater service covers installation, inspection, and code compliance.
Testing, Maintenance, and Common Problems

Expansion tanks last 5–10 years, and a 60-second yearly check prevents unpleasant surprises. Add this quick test to your normal water-heater maintenance.
How to Test Your Expansion Tank

- Tap test – top should sound hollow, bottom solid.
- Schrader valve – press briefly; air is good, water means failure.
- Temperature feel – cool on top, warm below.
- Pressure gauge – should match house pressure; recharge if low.
Common Failure Points
- Diaphragm (bladder) rupture – tank waterlogs and can weigh 40 lb+.
- Pinhole leaks from corrosion.
- Condensation in humid spaces leading to rust.
- Improper or forgotten air charge during installation.
Our preventative HVAC Maintenance Plans include this inspection so you never have to wonder.
Frequently Asked Questions about Expansion Tank Installation
What is the typical cost?
A quality 2-gal tank starts around $40; a 5-gal premium model can reach $200. Professional installation in Northwest Washington usually lands between $150 and $450 depending on access and code upgrades. DIY saves labor, but mistakes can easily wipe out those savings.
Can I install an expansion tank horizontally?
Vertical is preferred and delivers full capacity, but a horizontal mount is acceptable when space demands. Support the entire length of the tank with a rated strap or cradle, and follow the manufacturer’s instructions to keep your warranty intact.
How do I know if my expansion tank has failed?
- T&P valve drips while the heater runs.
- Hot-water pressure surges or “pulses.”
- Water sprays from the Schrader valve.
- Whole tank feels heavy—no hollow “air” section on top.
Any of these signs mean the tank is no longer protecting your plumbing. Replacement is quick and inexpensive compared with the damage unchecked pressure can cause.
Conclusion: A Safer System and Peace of Mind
Installing a water heater expansion tank is honestly one of the smartest investments you can make in your home’s plumbing system. It’s like giving your pipes a safety net – one that catches all that extra pressure before it can cause real problems.
Think about it this way: your water heater works hard every day, heating hundreds of gallons of water. Without an expansion tank, all that thermal expansion has to go somewhere. Usually, that “somewhere” is stressing your pipes, wearing out your fixtures, and shortening your water heater’s life. Not exactly what you want happening behind your walls.
The benefits of proper expansion tank installation go way beyond just following building codes. You’re protecting every part of your plumbing system – from the smallest fitting to your expensive water heater. Plus, you’re giving yourself real peace of mind knowing that your system is operating safely.
When it comes to DIY vs. professional water heater expansion tank installation, both approaches have their place. If you’re handy with tools and comfortable working with plumbing, this project is definitely doable. But here’s the thing – plumbing mistakes can be expensive. Really expensive.
Professional installation ensures everything is done right the first time. We know the local codes, have the right tools, and can spot potential problems before they become disasters. Plus, when a professional does the work, you get warranties and guarantees that protect your investment.
For homeowners in Whatcom, Skagit, Snohomish, and San Juan Counties who want the job done right without the hassle, our team at Clean Air Heating & Cooling has you covered. We’ve installed hundreds of expansion tanks over the years, and we understand exactly what it takes to keep your system running safely and efficiently.
Don’t put off this important safety upgrade. Your plumbing system works 24/7 to keep your family comfortable – it deserves the protection that only a properly installed expansion tank can provide.
Ready to give your water heater the protection it needs? Contact us for professional water heater services and let our experienced team handle your expansion tank installation with the care and expertise it deserves.