Why Mini Split AC Installation is the Smart Choice for Modern Homes
Mini split AC installation is the go-to solution for homeowners seeking efficient, flexible heating and cooling without the expense and complexity of traditional ductwork. These systems offer precise temperature control for individual rooms while delivering impressive energy savings.
Key Benefits of Mini Split Systems:
- No ductwork required – perfect for older homes or room additions
- Zone control – heat and cool only the rooms you’re using
- High efficiency – SEER2 ratings from 17 to 42, far exceeding central AC’s minimum of 15
- Quiet operation – whisper-quiet compared to traditional HVAC systems
- Year-round comfort – provides both heating and cooling
A mini split system has two main components: an indoor air handler on your wall and an outdoor condenser unit. They connect through a small 2-3 inch hole in your wall that carries refrigerant lines, electrical wiring, and a condensate drain.
The system works by exchanging heat. In summer, it moves heat from your room outside. In winter, the process reverses, pulling heat from the outside air to warm your home.
One Reddit user noted significant savings after a DIY project: “I DIYed 5 mini split units for $5k total, compared to professional quotes of $40k.” While professional installation typically ranges from $2,000 to $10,500, the potential for savings makes this an attractive option.
I’m Colin Matei, owner of Clean Air Heating & Cooling, and I’ve helped Bellingham area homeowners with mini split AC installation for years. While DIY can save money, understanding the critical steps and safety requirements is essential for success.

Before You Begin: Planning Your Mini Split Project
Proper planning for your mini split AC installation will save you from costly mistakes and ensure your system keeps you comfortable year-round. Key decisions include system sizing, type, and whether to DIY or hire a professional.

Choosing the Right Size and Type for Your Home
Getting the right size mini split is crucial. An undersized unit will struggle to keep up, while an oversized unit will cycle too frequently, wasting energy and creating a humid environment.
BTU (British Thermal Units) capacity measures your system’s power. As a starting point, a 400-square-foot room typically needs around 9,000 BTU, while a 600-square-foot space usually requires 12,000 BTU. Larger areas of 1,000 sq ft may need 18,000 BTU, and spaces up to 1,500 sq ft need about 24,000 BTU.
However, sizing isn’t just about square footage. Factors like our Pacific Northwest climate, room insulation, window exposure (south-facing windows add heat), and ceiling height all affect the required BTU capacity.
Single-zone systems (one indoor, one outdoor unit) are great for a single room or addition. Multi-zone systems connect one outdoor unit to several indoor units (typically 2-8), allowing for different temperature zones throughout your home.
Most modern mini splits are also heat pumps, providing both heating and cooling. They are highly efficient, especially in our mild winters.
For detailed guidance, see our guide: How to Size a Mini Split System. For more on BTUs, the Energy Information Administration has helpful info: More about BTU capacity.
The Great Debate: DIY vs. Hiring a Professional
Deciding between DIY and professional installation is a key step. Let’s compare the options.
| Factor | DIY Installation | Professional Installation |
|---|---|---|
| Cost | Can start around $1,900 for unit and basic tools – significant savings potential | Professional installation provides comprehensive service and warranty protection |
| Time | Weekend project for most homeowners (one user reported 9 hours total) | Single-zone system typically takes 4-8 hours with professional efficiency |
| Required Tools | Vacuum pump, gauges, torque wrench, hole saw (tool kit ranges $80-$350) | All specialized tools and equipment provided by certified technicians |
| Warranty | Often voided by manufacturers without licensed professional installation | Full manufacturer warranty maintained with certified installation |
| Risk | Higher leak risk (1 in 10 units) plus potential EPA compliance issues | Much lower leak risk (1 in 200 units) with full regulatory compliance |
The main appeal of DIY is cost savings. A single unit with tools might cost around $1,900, a fraction of professional installation. A DIY installation can be a weekend project, taking about 9 hours of work for a single zone.
However, DIY requires comfort with electrical and mechanical work, plus specialized tools costing $80-$350. The biggest DIY risk is leaks. Statistics show a 1 in 10 leak rate for DIY, versus 1 in 200 for professional jobs. Leaks waste energy and can be costly to fix.
Furthermore, many manufacturers void warranties for DIY installations, leaving you responsible for future repair costs. Legally, handling refrigerant requires EPA certification, with fines up to $25,000 for violations. Most areas also require licensed professionals for high-voltage electrical work.
Professional installation provides peace of mind. Certified technicians handle complex refrigerant and electrical work safely and to code, ensuring your system runs efficiently and your warranty remains valid.
The choice is yours. But for guaranteed safety, efficiency, and warranty protection, professional installation is the smartest choice for the most critical steps.
Learn more about professional costs here: Mini Split Installation Cost.
Essential Tools, Materials, and Safety Protocols
Whether you’re attempting a DIY mini split AC installation or just curious, it’s helpful to know the tools and safety measures involved. A proper installation requires more than a basic homeowner’s toolkit.

Tools and Materials You’ll Need
Specialized HVAC tools are what separate a successful installation from a costly mistake.
- Vacuum Pump: Non-negotiable for traditional mini splits. It removes air and moisture from refrigerant lines, which is crucial to prevent internal system damage.
- Manifold Gauge Set: Measures pressure and vacuum in the lines, essential for proper vacuuming and charging.
- Torque Wrench: Critical for tightening refrigerant line connections to the manufacturer’s specification, preventing leaks without damaging fittings.
You’ll also need a 2-3 inch hole saw, power drill, level, stud finder, wrenches, and safety gear. A condenser pad or wall bracket is needed for the outdoor unit, and a line set cover provides a clean finish. Professionals also use a nitrogen tank for pressure testing and a micron gauge for precise vacuum readings (below 500 microns) to ensure system longevity.
Legal and Safety Considerations for Your Mini Split AC Installation
This isn’t a weekend deck project. We’re talking about high-voltage electricity and pressurized refrigerant systems that demand respect.
- Electrical Safety: Always turn off power at the breaker before any electrical work. Mini splits often require a dedicated 220-volt circuit. High-voltage work can be fatal; do not take risks.
- Refrigerant Handling: Handling refrigerants like R410a is regulated by federal law. It requires EPA 608 certification due to environmental risks and the danger of severe skin burns. Improper handling can lead to fines up to $25,000. For more information, visit: EPA certification information.
- Permits and Codes: Check with your local building department in Bellingham or Whatcom County for permit requirements. Most jurisdictions require permits for HVAC work to ensure code compliance. Skipping this can lead to fines or other issues.
- Professional Help: We strongly recommend hiring a licensed electrician for the final high-voltage connections. Proper wiring, grounding, and circuits are critical for safety and performance.
The Ultimate Guide to Mini Split AC Installation
Here are the steps for a mini split AC installation. Critical refrigerant and high-voltage electrical connections should always be handled by a licensed professional. For a comprehensive overview of our services, visit: Ductless Mini Split Installation.
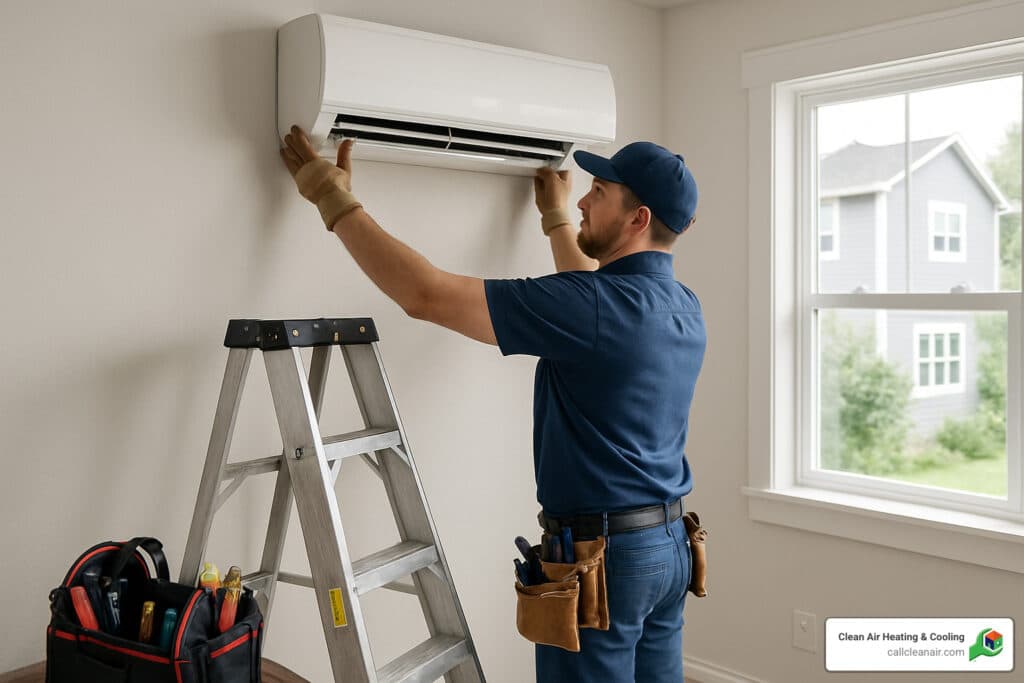
Step 1: Installing the Indoor Unit (Air Handler)
The indoor unit’s placement is crucial for performance and aesthetics.
- Choose an exterior wall for the simplest installation. This provides a direct path for the line set and drain.
- Use a stud finder to locate studs. The mounting bracket must be secured to at least one stud for stability. If not possible, use heavy-duty drywall anchors.
- Position the mounting bracket on the wall, ensuring proper clearance for airflow (at least six feet from the floor for cooling).
- This is vital: Use a level to ensure the bracket is perfectly straight. An unlevel unit won’t drain correctly, causing leaks.
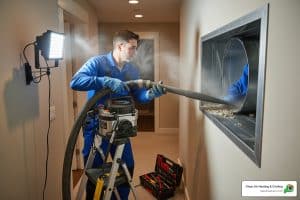
- Mark and drill a 2- to 3-inch hole for the line set and wiring to pass through the wall.
- Drill the hole at a slight downward angle to the outside to ensure proper condensate drainage. Check for pipes or wires in the wall first.
Step 2: Installing the Outdoor Unit (Condenser)
Proper placement of the outdoor unit is key to efficiency and longevity.

- Select a location that is accessible, has good airflow, and is away from quiet areas. A shorter line set run is more efficient.
- Place the unit on a level concrete pad or use a wall bracket. In snowy areas, ensure the unit is raised 1-2 feet off the ground.
- Ensure adequate clearance. The outdoor unit needs at least 12 inches of clearance on all sides (2-3 feet is ideal) for proper airflow.
- Use rubber vibration pads under the unit to reduce noise and vibration.
- Securely bolt the unit to its pad or bracket to prevent shifting.
Step 3: The Critical Connections for Your Mini Split AC Installation
This is where a DIY project should stop and a professional should take over.
- Route the line set carefully from the indoor to the outdoor unit. Avoid kinking the copper lines. Coil any excess line set horizontally in wide loops; do not cut it unless you are a certified professional.
- Connect the refrigerant lines using a torque wrench to tighten the flare nuts to the manufacturer’s specifications. This is a critical step to prevent leaks.
- Connect the condensate drain line, ensuring it has a continuous downward slope away from the house foundation.
- Connect the electrical wiring. The control wire connects the indoor and outdoor units. The main power supply connects to the outdoor unit. This step requires a licensed electrician for safety and code compliance.
- Vacuum the lines. For traditional systems, this is the most critical step for longevity. A vacuum pump removes air and moisture, preventing internal corrosion. A deep vacuum (below 500 microns) is essential.
- Perform a leak test. A professional will use nitrogen to pressure test for leaks. After vacuuming, a decay test confirms the system is sealed. If the vacuum doesn’t hold, there’s a leak that must be fixed.
Once a professional completes these connections, the system is tested to ensure it’s safe, efficient, and reliable.
Maximizing Efficiency and Understanding Costs
Now that your mini split AC installation is complete, let’s talk about maximizing its efficiency. Mini splits offer incredible savings through zoned heating and cooling. By conditioning only the rooms you use, you can cut energy bills by up to 50% compared to traditional systems.
Modern mini splits have high SEER2 ratings (17 to 42), far exceeding the legal minimum of 15. A higher rating means more savings on your utility bills.
Utility and government rebates can further reduce costs. Puget Sound Energy offers generous incentives: PSE Heat Pump Rebate. We also offer flexible payment options to make your investment manageable: HVAC Financing Options.
Regular maintenance is key to long-term efficiency. Clean filters monthly, keep the outdoor unit clear of debris, and schedule professional tune-ups. Learn more in our guide: Mini Split Maintenance.
Common Questions About Placement and Efficiency
Here are answers to common questions about getting the best performance from your system:
Where’s the best spot for the indoor unit?
Center the indoor unit on a wall, away from heat sources like TVs or direct sunlight, for the best air distribution and thermostat accuracy.
How much space does the outdoor unit really need?
Give the outdoor unit at least 12 inches of clearance on all sides, though 2-3 feet is better. Blocked airflow reduces efficiency.
Does the distance between units matter?
Shorter line set runs are generally better for peak efficiency, though some systems can handle very long lines.
How can I keep my system whisper-quiet?
Ensure the outdoor unit is on a solid, level surface with vibration pads. Avoid placing it directly outside bedrooms.
Why is filter cleaning so important?
Clean filters monthly during peak use. Clogged filters restrict airflow, reduce efficiency, and can damage the system.
For more on how these systems work, read our guide: How Ductless Mini-Split Systems Work.
Frequently Asked Questions about Mini Split Installation
Here are answers to the most common questions we get about mini split AC installation in the Bellingham area.
Do I have to cut a hole in my wall for a mini split?
Yes, but it’s only a small hole, just 2 to 3 inches in diameter. This allows the line set to connect the indoor and outdoor units. It’s far less invasive than installing ductwork for central air, and you’ll barely notice it once the line set cover is in place.
Is it legal to install my own mini split?
This is tricky. While you can physically mount the units, US law requires a licensed and EPA 608 certified professional to handle refrigerants and high-voltage electrical connections. This is for safety and environmental protection. Attempting this yourself can lead to large EPA fines, a voided warranty, and serious safety hazards like electrical shock or fire.
How long does a mini split ac installation take?
A professional can typically install a single-zone system in 4 to 8 hours. A multi-zone system takes longer, often a full day or more. A DIY installation is usually a weekend project. One homeowner reported 9 hours of work for a single unit, not including extra trips to the hardware store or the learning curve involved.
Conclusion: Is a DIY Installation Right for You?
We’ve covered a lot about mini split AC installation, from its impressive efficiency to the detailed steps involved. The DIY path offers cost savings and the satisfaction of a completed project. If you’re handy, mounting the units can be a rewarding task.
However, the most critical steps—refrigerant handling, vacuuming, and high-voltage electrical work—require certified professionals. DIY installations have a 1 in 10 chance of refrigerant leaks compared to just 1 in 200 for professional installations. This affects efficiency, safety, your warranty, and long-term reliability.
Modern mini splits are sophisticated, high-efficiency systems. Professional installation protects your investment and ensures you get the performance and longevity you paid for.
For homeowners in Bellingham, Whatcom County, Skagit County, Snohomish County, and San Juan County, our team understands the local climate and building codes, ensuring your installation is done right for our region.
At Clean Air Heating & Cooling, our 25% utility savings guarantee and over 480 5-star Google reviews show our commitment to excellence. We provide peace of mind with professional installation, full warranty protection, and ongoing support.
The bottom line? Professional installation protects your investment, ensures safety, and delivers the comfort you expect. Don’t leave your family’s comfort to chance.
Ready to experience the difference professional installation makes? Contact us today for all your mini split needs: Mini Splits HVAC Services. We’re here to help you achieve the perfect balance of comfort, efficiency, and peace of mind.