Why Clean Coils Matter: The Secret to Heat Pump Efficiency
Heat pump coil cleaning is essential for maintaining your system’s efficiency and extending its lifespan. Here’s what you need to know:
- When to clean: At least once yearly; twice yearly in dusty areas
- Signs coils need cleaning: Reduced cooling/heating, higher energy bills, ice formation
- DIY cleaning basics: Turn off power, clear debris, gently rinse with water, apply coil cleaner, rinse again
- Professional cleaning recommended: For indoor evaporator coils and thorough maintenance
Dirty coils can reduce your heat pump’s efficiency by up to 30%, leading to higher energy bills and increased wear on components. Regular cleaning helps your system run smoothly and prevents costly breakdowns.
Heat pumps have two sets of coils that transfer heat: outdoor condenser coils and indoor evaporator coils. When these coils get clogged with dirt, dust, pollen, or debris, they can’t effectively transfer heat, forcing your system to work harder.
I’m Colin Matei, owner of Clean Air Heating & Cooling, with over 15 years of experience performing professional heat pump coil cleaning for homeowners throughout Whatcom, Skagit, and Snohomish counties.

How Heat Pump Coils Work and Why They Get Dirty
Heat pumps transfer rather than generate heat, making them highly efficient climate control systems for Northwest Washington homes. At their core are two sets of coils working together in a continuous refrigerant loop.
Your heat pump coils are typically made of copper tubing surrounded by aluminum fins—materials chosen for their excellent heat conductivity. Most residential systems use:
- Finned coils with metal fins that increase surface area for better heat transfer
- Plate coils made of a series of plates (less common, typically for specialized applications)
These efficient heat-transferring surfaces attract airborne particles. In the Pacific Northwest, they’re constantly bombarded with dust, pollen, cottonwood fluff, pet hair, salt spray (in coastal areas), and yard debris.
When these particles build up on your coils, they create an insulating barrier that prevents the very heat transfer your system relies on.
Role of Outdoor (Condenser) Coils

Your heat pump’s outdoor unit houses the condenser coils. In cooling mode, these coils release heat collected from inside your home. The refrigerant, having absorbed heat from your indoor air, travels to these outdoor coils where it condenses from a gas back to a liquid, releasing that captured heat outdoors.
These outdoor coils face the toughest job because they’re completely exposed to the elements. They constantly pull in outdoor air while sitting in locations where leaves, grass clippings, and other debris can accumulate.
Role of Indoor (Evaporator) Coils
Inside your home, typically hidden in your air handler or attached to your furnace, are the evaporator coils. When your system is cooling, these coils absorb heat from your indoor air as it passes over them. The refrigerant inside evaporates, carrying that heat away to be expelled outside.
These indoor coils also act as natural dehumidifiers. As warm air contacts the cool coil surface, moisture condenses on the coil and drips into a collection pan.
Even though they’re inside, these coils still get dirty from airborne dust that slips past filters, microbial growth from the constant moisture, and other indoor air pollutants from everyday living.
The Impact of Dirty Coils & When to Clean Them
Neglecting heat pump coil cleaning can lead to more than just a slightly uncomfortable home. Over time, those dirty coils can cause serious problems.
Think of your heat pump coils like the radiator in your car – when they get clogged up, everything suffers. Research shows dirty coils can slash your system’s efficiency by up to 30%, increasing your utility bills significantly.

When dirt builds up, your heat pump struggles to transfer heat properly. This forces it to run longer cycles, working harder while delivering less comfort. Your system might develop refrigerant pressure issues that could damage the compressor – one of the most expensive components to replace.
In the worst cases, you might experience frozen evaporator coils, circuit breaker trips, or poor indoor air quality. All this extra strain significantly shortens your equipment’s lifespan.
According to the latest research on AC maintenance, regular cleaning is one of the most cost-effective ways to maintain efficiency.
Warning Signs Your Coils Need Attention
Your heat pump will usually send you clear signals when it needs cleaning:
- Weak airflow coming from your vents
- Lukewarm air during cooling mode
- Running constantly without reaching your set temperature
- Ice buildup on refrigerant lines or the outdoor unit
- Rising energy bills without any change in usage patterns
- Unusual noises from your outdoor unit
- Unpleasant odors when the system runs
- Visible dirt on the outdoor coil fins
Recommended Cleaning Frequency
For most homeowners in our service area, an annual professional cleaning provides a good baseline. However, if you live in a particularly dusty area or near construction, consider biannual cleaning in spring and fall.
Allergy sufferers should schedule a seasonal inspection after pollen season, while homes near cottonwood trees might benefit from weekly visual checks during those few weeks when the fluff is flying.
What You Need Before Starting: Tools, Materials & Safety
Before tackling heat pump coil cleaning, gather these essentials for a safe and effective job:
Basic toolkit:
* Garden hose with adjustable nozzle
* Soft-bristle brush (avoid wire brushes)
* Fin comb matching your coil’s fin density
* Screwdriver set
* Spray bottle
* Clean microfiber towels
Materials:
* Environmentally-friendly coil cleaner (foaming or no-rinse varieties)
* Distilled white vinegar (for condensate drains)
* 3% hydrogen peroxide solution (for mold/mildew issues)
Safety equipment:
* Chemical-resistant work gloves
* Safety goggles
* Respiratory mask
* Long sleeves and pants
* Sturdy closed-toe shoes
* Electrical safety gloves (if handling electrical components)

Safety Precautions That Cannot Be Skipped
When it comes to heat pump coil cleaning, safety is non-negotiable:
- Always disconnect power completely before starting work (at both the unit’s disconnect switch AND circuit breaker panel)
- Wait for the fan to completely stop before putting hands near the unit
- Never tamper with refrigerant lines – this requires special certification
- Work in well-ventilated areas when using cleaning products
- Avoid high-pressure washers which can damage fins and force water into electrical components
- Keep water away from electrical connections and control boxes
- Consider weather conditions – avoid extremely hot or freezing days
- Wear protective gear to prevent cuts from sharp fins and panels
Most importantly, know when to call a professional. If you encounter anything unexpected during cleaning, it’s time to contact Clean Air Heating & Cooling for expert heat pump coil cleaning services.
Heat Pump Coil Cleaning: Outdoor Unit Step-By-Step
Let’s tackle heat pump coil cleaning for your outdoor unit with this straightforward guide.
Step 1 – Power Down & Inspect
- Turn off all power to your unit at both the outdoor disconnect box and your home’s circuit breaker panel
- Wait about 5 minutes for the system to fully power down
- Inspect for damaged fins, oily spots (potential refrigerant leaks), loose connections, unusual rust, or wildlife intrusions
Step 2 – Clear Debris & Straighten Fins
- Remove large debris like leaves, twigs, or grass clippings from around the unit
- Clear vegetation to maintain a 2-3 foot clearance zone around your heat pump
- If comfortable doing so, remove the top grille or fan assembly for better access
- Use a vacuum with a soft brush attachment to gently remove loose debris
- Use a fin comb matching your coil’s fin density to straighten bent fins
Step 3 – Gentle Rinse & Apply Cleaner
- Cover any exposed electrical components with plastic
- Using a garden hose with gentle spray, rinse the coils (from inside out if possible)
- Apply an environmentally friendly coil cleaner following product instructions:
- For foaming cleaners: Start at bottom, work upward
- For no-rinse formulas: Apply evenly without oversaturating
- Let the cleaner dwell for the recommended time (typically 5-15 minutes)
- For stubborn dirt, gently scrub with a soft-bristle brush in the direction of the fins
Step 4 – Final Rinse, Dry & Test
- Thoroughly rinse until water runs clear and all cleaning solution is removed
- Allow to air dry completely before restoring power
- Reassemble any removed panels or components
- Restore power at both the disconnect and circuit breaker
- Adjust your thermostat to call for heating or cooling and verify proper operation
Maintain that 2-3 foot clearance zone around your outdoor unit and check it periodically – especially after storms or during high pollen seasons.
For more detailed information about professional heat pump cleaning services, visit our Heat Pump Cleaning page.
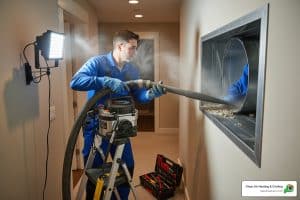
Heat Pump Coil Cleaning for Indoor Evaporator Coils
Cleaning indoor evaporator coils requires extra care compared to outdoor units. While professional service is recommended, here’s a guide for DIY-minded homeowners:
- Safety first: Turn off all power to your air handler at the circuit breaker
- Access the coil: Locate and carefully remove the access panel near your air handler or furnace
- Replace/clean air filter: Prevent newly cleaned coils from getting dirty again
- Inspect the coil: Look for dirt buildup, mold signs, or damage
- Gentle cleaning: Vacuum using a soft brush attachment, moving in the direction of the fins
- Apply cleaner: Use a no-rinse evaporator coil cleaner designed for indoor use
- Clean the drain pan: Remove debris and wipe with mild detergent
- Flush the drain line: Pour a cup of white vinegar into the drain pan followed by warm water
- Reassemble: Allow everything to dry, replace the access panel, restore power, and test
When DIY Stops: Call a Pro
Some situations require professional heat pump coil cleaning help:
- Limited access to your evaporator coil
- Signs of refrigerant leaks like oil stains or hissing sounds
- Excessive mold growth on or around coils
- Damaged fins needing extensive repair
- Ice formation on coils during operation
- Warranty concerns – DIY cleaning may void some warranties
Clean Air Heating & Cooling technicians have the specialized tools and training to safely address these complex situations throughout Whatcom, Skagit, Snohomish, and San Juan Counties. More info about HVAC Cleaning and Inspection
Preventive Tasks Between Cleanings
Between professional visits, these simple habits help maintain efficiency:
- Change filters monthly during heavy use seasons
- Keep supply and return vents open and unobstructed
- Maintain proper humidity levels (30-50%)
- Clear debris from around outdoor unit weekly
- Trim vegetation to maintain clearance around outdoor unit
- Rinse outdoor unit gently during heavy pollen/cottonwood season
- Monitor for unusual noises or energy bill increases
DIY vs Professional Care & Ongoing Maintenance
When it comes to heat pump coil cleaning, here’s how DIY and professional approaches compare:
| Aspect | DIY Approach | Professional Service |
|---|---|---|
| Cost | Lower immediate cost | Higher upfront cost but potential long-term savings |
| Equipment | Basic household tools | Specialized professional equipment |
| Chemicals | Consumer-grade cleaners | Professional-grade, environmentally safe solutions |
| Thoroughness | Surface cleaning possible | Complete cleaning of all components |
| Risk | Potential for damage | Minimal risk with trained technicians |
| Warranty | May void some warranties | Preserves manufacturer warranties |
| Time | Your personal time investment | Efficient service in 1-2 hours |
| Additional Benefits | Basic cleaning only | Full system inspection and optimization |
At Clean Air Heating & Cooling, our maintenance agreements provide not just regular professional cleaning but comprehensive system checks that spot small issues before they become expensive problems.
Energy Efficiency & System Lifespan Boost
Regular professional heat pump coil cleaning delivers multiple benefits:
- 25% utility savings guarantee for our maintenance customers
- Systems typically last 5-10 years longer than neglected ones
- Up to 85% fewer repairs than systems without regular care
- More consistent temperatures throughout your home
- Quieter operation
- Improved indoor air quality
- Peace of mind during Northwest Washington temperature extremes
Common Mistakes to Avoid
Whether DIY or professional, avoid these common mistakes:
- Using pressure washers – can permanently damage delicate fins
- Applying harsh chemicals – corrodes coils over time
- Skipping safety gear – risks cuts and chemical exposure
- Bending fins – difficult to restore once damaged
- Ignoring drain lines – clogs cause water damage
- Working with power on – dangerous electrical hazard
- Over-brushing coils – aggressive scrubbing damages fins
- Incomplete rinsing – leaves corrosive chemical residue
- Cleaning during freezing weather – water can freeze and damage components
- Neglecting filter replacement – allows dirt to bypass and reach coils
Frequently Asked Questions about Heat Pump Coil Cleaning
How often should coils be cleaned?
Most Northwest Washington homeowners should schedule professional heat pump coil cleaning at least once yearly, ideally in spring. If your home is in a dusty area, near construction, or has pets, consider twice-yearly cleanings (spring and fall).
During cottonwood season or heavy pollen periods, weekly gentle rinses of your outdoor unit with a garden hose can prevent buildup between professional cleanings.
Can I clean coils without special chemicals?
For outdoor coils with light dust, a gentle spray from your garden hose might suffice. A mild solution of dish soap and water can work on outdoor coils with moderate dirt.
However, specialized coil cleaners offer advantages:
* Break down stubborn grime water can’t touch
* Foam and penetrate deep into tight coil structures
* Minimize mechanical scrubbing that might damage fins
* Some self-rinse in indoor applications
* Many prevent microbial growth
For indoor evaporator coils, only use products specifically designed for indoor HVAC applications.
What if cleaning doesn’t restore performance?
When heat pump coil cleaning doesn’t solve performance issues, consider these potential culprits:
- Refrigerant problems requiring professional attention
- Airflow restrictions elsewhere in your system
- Compressor issues affecting overall efficiency
- Control board malfunctions causing erratic operation
- System age – units over 10-15 years may need replacement
Clean Air Heating & Cooling technicians can provide thorough diagnostic assessment and recommend the most cost-effective solution for your specific situation.
Conclusion
Heat pump coil cleaning is an investment in your home’s comfort, your family’s health, and your monthly energy bills. While DIY outdoor coil cleaning is possible, professional care provides best thoroughness and peace of mind.
At Clean Air Heating & Cooling, we understand the unique challenges our Pacific Northwest climate presents to heat pump systems. Whether it’s coastal air affecting homes in the San Juans, agricultural dust in Skagit Valley, or urban pollutants in Snohomish County—we know exactly how to address it.
Our comprehensive maintenance plans go beyond just cleaning coils. Our technicians perform complete system inspections that catch small issues before they become expensive problems. We’re so confident in our service that we back it with our 25% utility savings guarantee.
The most expensive service call is the one you could have prevented. Regular heat pump coil cleaning is preventive medicine for your HVAC system—and prevention always costs less than the cure.
Contact Clean Air Heating & Cooling today to schedule your professional heat pump coil cleaning service and experience the difference our expertise makes.
More info about heat pump services